Millions of iPhone, iPad and iPod touch users have been readily updating their firmware to the all-new iOS 7 since it first arrived on September 18th, but much like iOS 6 on the iPhone 3GS, the iPhone 4 struggles to offer the smooth, streamlined experience demanded by iOS 7. For the most part, it’s not particularly problematic, but if you’re rocking 2010′s flagship and would like to revert back to iOS 6, there may be a reprieve around the corner.
You need to have SHSH blobs for iOS 6.1.3 (which you can grab from TSS Servers through iFaith). Thismethod works only for iPhone 4 and you need a Windows machine for the process. Also, you cannot use an iOS 7 backup to restore. Read on.
Apple often prevents users from downgrading to older versions of iOS once a new version launches. This crazy thing happened with iOS 6 and iOS 5 and Apple’s repeating the same thing with iOS 7. In fact, this time around, it’s doing it with great vigor. Which explains why this method works only foriPhone 4.
In Order to Downgrade iPhone 4 from iOS 7.x to iOS 6.1.3 Using iFaith You’ll Need
Connect your iPhone 4 to the computer. If iTunes fires up automatically, close it.
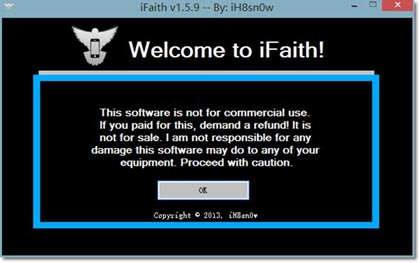
Open iFaith and click OK
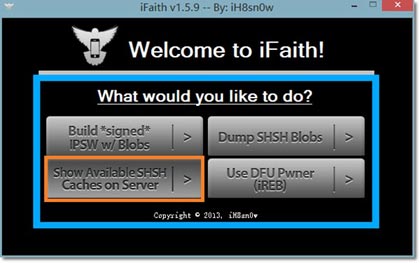
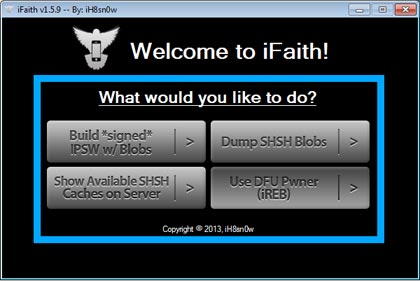
Click ‘Show Available SHSH Caches on Server’
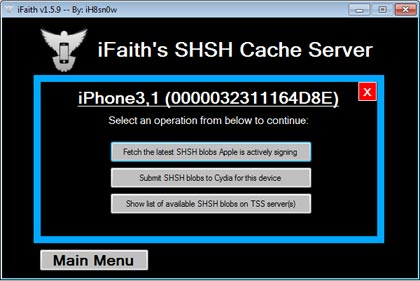
Click YES when it asks you if you want to use your newly connected device
Out of the 3 options shown, select ‘Show a list of available SHSH Blobs on TSS Server(s)’
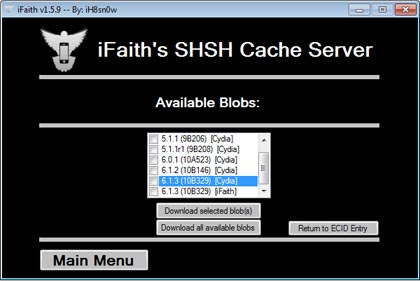
After a few moments (during which the blobs will be fetched), you will be shown this screen: Select the 6.1.3 blob from [Cydia] or [iFaith]
Click ‘Download selected blob(s)’ and a prompt for a location to save the blob appears. Select one and click Ok. A dialog box pops up when the download is complete.
B: Preparing the IPSW
Quit iFaith and relaunch it.
Click OK to continue.
Click on ‘Build *signed* IPSW w/Blobs’
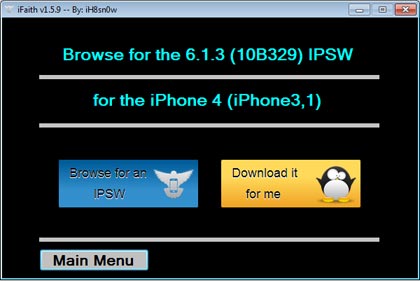
Click on Browse for SHSH blobs’ and select the blob you just downloaded.
Click OK to continue a message appears saying that the apticket looks valid.
Now, click on Browse for an IPSW. Choose the iOS 6.1.3 file.
Click on Build IPSW
This new IPSW file will be saved on your computer. Note the name of the file. This is the file we’ll be using to downgrade.
C: The PWNED DFU Mode
You will now have to go into Pwned DFU mode to trick iTunes and install IPSW file on your iPhone 4. Here’s how to do that:
With iFaith running and iPhone connected, switch off your iPhone 4.
Put iPhone 4 in DFU mode (power+home button for a few seconds, release power and hold home button for 10-15 seconds)
Open iTunes. Click on the device name (from the sidebar or on top-right).
Hold down ‘Shift’ and click on Restore.
Select the IPSW file that iFaith produced in the previous section.
Once iTunes completes the restore, your iPhone 4 should be running iOS 6.1.3.
iPhone 4, iPhone 3GS and iPod touch 4G users who have accidentally upgraded to iOS 6 can downgrade toiOS 5.1.1 using Redsn0w if they’ve saved SHSH blobs using TinyUmbrella using this step-by-step tutorial.
Some important points before we proceed:
This guide is meant for iPhone 4, iPhone 3GS and iPod Touch 4G users. It is currently not possible to downgrade the newer iOS devices such as iPhone 4S, iPad 2 and iPad 3. You can find out more detailshere.
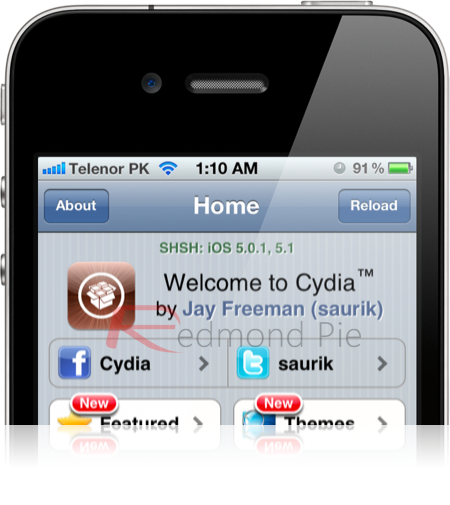
This method will work only if you’ve saved your SHSH blobs for iOS 5.1.1 either using TinyUmbrella or had jailbroken your iPhone when it was running iOS 5.1.1 and launched Cydia at least once, which would have cached the SHSH blobs on its servers.
Since the method restores your iPhone with iOS 5.1.1, you need to go through the process of setting up your iPhone from the backup, which can take sometime.
Please note that when you restore from backup, you will only see only iOS 5.1.1 or lower compatible backups.
Here’s the step-by-step instructions to downgrade your iOS device using Redsn0w:
Step 1: Download RedSn0w 0.9.14b2 (RedSn0w 0.9.14 beta 2) from this link.
Step 2: Download iOS 5.1.1 firmware file for your iPhone 4/iPhone 3GS from this link or for iPod touch 4g from this link.
Step 3: Turn off your iOS device and connect it your computer.
Step 4: You will now need to put your iOS device into the DFU mode. You can follow these simple steps to put your iPhone in DFU mode:
(a) Hold the Power button on iOS device down for 3 seconds:
(b) Now simultaneously hold the Home button and keep the two buttons pressed for 10 seconds:
(c) Now release the Power button while keeping the Home button pressed until your device’s screen goes black or iTunes pops up a message telling you that it has detected an iPhone in recovery mode.
Step 5: Double click the Redsn0w zip file and extract the application to the Redsn0w folder.Navigate back to the Redsn0w folder and launch the Redsn0w application. Please ensure that you have launched the latest version of Redsn0w.
Windows 7 users should run the exe in Windows XP compatibility mode (right-click on the Redsn0w exe and select Properties, then select the Compatibility tab and select Run this program in compatibility mode for Windows XP). Windows XP and Windows 7 users should run Redsn0w as ‘Administrator’ (right-click on the Redsn0w exe and select ‘Run as an Administrator’).
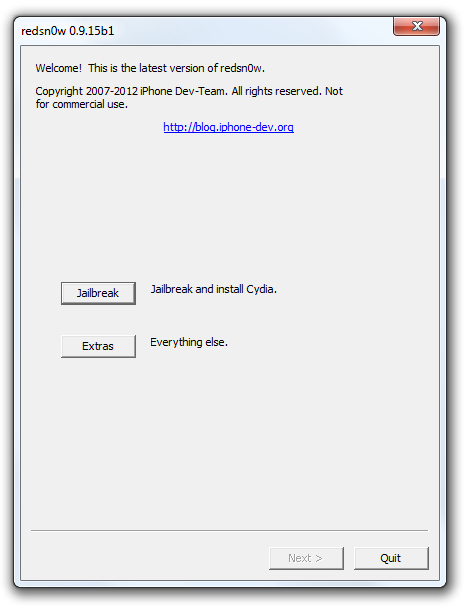
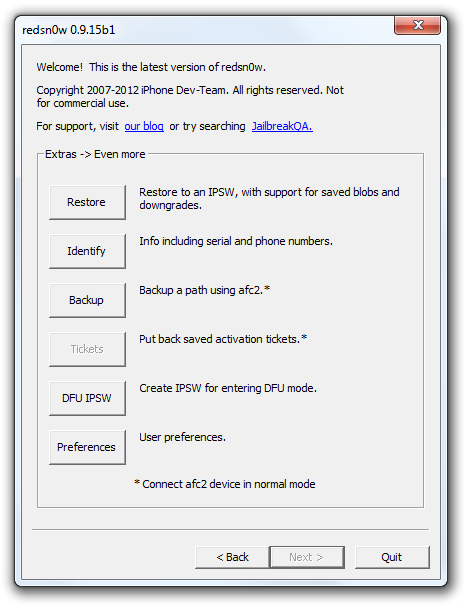
Step 6: Redsnow will report that your iOS device is connected in DFU mode (For example: Connected: iPhone 4 (DFU mode)). Click on the Extras button, then click on SHSH blobs button, followed by the Stitch button.
Step 7: Click on the IPSW button, here browse to the location you had downloaded the iOS firmware file and select the .ipsw file.
Step 8: In the next step, you need to retrieve the iOS 5.1.1 SHSH blobs for the downgrade process. If you’ve them stored locally then click on the Local button or click on the Cydia button, if you want Redsn0w to download them from Cydia. If you had jailbroken your iOS device while it was running iOS 5.1.1 and launched Cydia at least once then it would have cached the SHSH blobs on the server. Redsn0w will show the progress bar as it Fetching blobs from the server.
Step 9: Once Redsn0w successfully downloads the iOS 5.1.1 SHSH blobs, it will stitch the SHSH blobs with the iOS 5.1.1 firmware file to create a custom iOS 5.1.1 firmware file (prefixed with your iOS device’s 13-digit ECID) that will allow you to downgrade. Redsn0w will notify you that “Blob stitching done” and place the custom file in the same folder as iOS 5.1.1 firmware file.
Step 10: Now go back to the Extras page on Redsn0w and click on the Pwned DFU button. Redsn0w will inform you that your device is in pwned DFU mode when it’s done. The screen on your iOS device will turn black and iTunes will detect that it is in recovery mode.
Step 11: You will now need to restore your iOS device with the custom iOS 5.1.1 firmware file created in step 9. Launch iTunes:
(a) Under the ‘Devices‘ section on the left pane of iTunes, click on your iOS device.
(b) Hold the Option key down (Windows users hold the Shift key down) and click on the ‘Restore‘ button
(c) Navigate and click on the custom iOS 5.1.1 firmware file to restore.
(d) Wait for iTunes to restore your iOS device, it will give you an unknown error (Error -1) at the end, don’t worry, you can ignore it.
Step 12: Launch Redsn0w again, click on the Extras button and then click on Recovery fix button. Put your iOS device in DFU mode again, and the Recovery fix will run.
Once the recovery fix is completed, your device will be successfully restored back to iOS 5.1.1.
If you’ve any problem downgrading then check out this video tutorial:
You’re all set to jailbreak your iOS device again. If you need help then check our How to Jailbreak page for the link to our latest guide to jailbreak your iOS device on iOS 5.1.1.
With every new revision of iOS, the firmware modding folk are always waiting to pounce, sourcing ways we can potentially jailbreak, unlock and downgrade our devices. With the release of iOS 6.0.1, the mindset is no different, and while there’s real big news on the jailbreaking front, those of you wishing to revert from the latest iOS 6.0.1 back to iOS 5.1.1 can do so with relative ease.
Of course, there are a couple of prerequisites. First and foremost, this only works on A4-enabled devices. So if you have an iPhone 4 or earlier, or iPod touch 4G or earlier, you can revert back to the older firmware. In addition to the hardware requirements, you must also have saved your SHSH blobs for the firmware you’re wishing to slip back to.
This guide is useful for those who want to get an untethered jailbreak on their A4 based devices, as both jailbreak iOS 6 and jailbreak 6.0.1 are currently limited to tethered boot.
The following tutorial works for both Windows and Mac, and uses the every jailbreaker’s necessity in Redsn0w.
Step 1: On your desktop, create a folder in which you will store all the necessary bits and pieces.
Step 2: Next, grab the very latest version of Redsn0w from (Windows | Mac), and once the download is complete, drop it into the folder you made in Step 1.
Step 3: In addition, you’ll also need to grab the necessary IPSW file for your device that you’re wishing to downgrade. [Download iOS 5.1.1 from here]
Step 4: Extract the Redsn0w.zip, and run the redsn0w file.
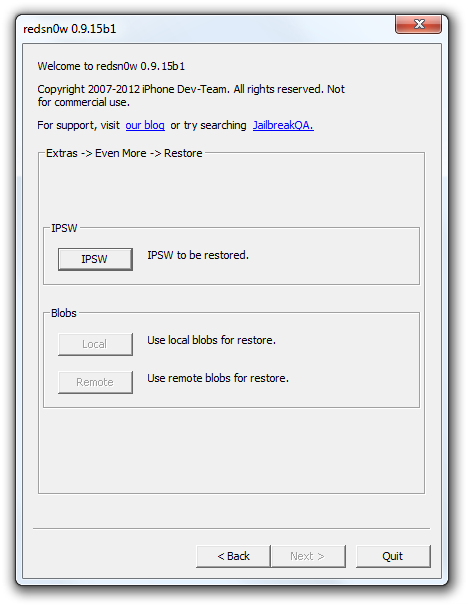
Step 5: Click Extras -> Even more -> Restore. Then click IPSW and navigate to your relevant IPSW file that you want to downgrade to.
Step 6: For those of you who rely on Ultrasn0w unlock, when prompted by Redsn0w, click Yes to "Prevent Baseband Update?" and then click the OK button on the following Pwned DFU screen.
Step 7: Connect your device, and follow the usual steps to put it into DFU mode.
Step 8: Once you’re safely into DFU mode, your device will be exploited with limera1n, after which Redsn0w will scan Cydia for the required blobs. If they cannot be located via Cydia, you can try again to double-check, or alternatively, navigate to them locally on your PC / Mac.
Step 9: Redsn0w will begin cooking up an image before restoring your device to the new, or should we say, old, firmware.
Step 10: After Redsn0w has worked its magic, you should be informed of a successful downgrade by means of the "restore successful" pane from iOS 6.0.1 back to iOS 5.1.1 where you can perform an untethered jailbreak.
It would be pretty darned wonderful if we didn’t have to jump through such hoops in order to downgrade, but with Apple keen to stamp out jailbreaking, unlocking and use of old firmware in general, don’t expect the Cupertino to go easy on us anytime soon.
iOS 8.2 was released today and it arrives to bring Apple Watch support to the iPhone, but if you’re having problems with the new update, you can downgrade to iOS 8.1.3 for a limited time.
While iOS 8.2 is a rather minor update in terms of new features, it includes a handful of minor bug fixes and improvements, but it’s a bigger update for those who are interested in buying an Apple Watch which will be available for pre-order on April 10 and will release on April 24.
Normally, you wouldn’t be able to downgrade back down to an older version of iOS, but Apple is still signing iOS 8.1.3, which means you have time to downgrade if need be.
UPDATE: iOS 8.1.3 is no longer being signed, which means if you upgraded to iOS 8.2, you can’t downgrade to iOS 8.1.3.
If you want to downgrade to iOS 8.1.3 from iOS 8.2, you’ll want to do it as soon as possible, because it’s only matter of time before Apple stops signing iOS 8.1.3. Afterward, you won’t be able to downgrade. Luckily, Apple is still signing iOS 8.1.3 right now, so you have a little bit of time to lock in iOS 8.1.3 if you’ve been having issues with iOS 8.2. Here’s how to do it.
Downgrading to iOS 8.1.3
Since iOS 8.2 is the latest version of iOS, you can’t simply open up iTunes and “update” to an older version. You have to add on a couple more steps, but luckily it’s fairly easy.
Before you do anything, make sure to back up your iOS device, because this method will wipe your iPhone or iPad entirely clean. Luckily, we have a handy guide on how to do just that.
First off, visit this website and download the iOS 8.1.3 IPSW for your specific iOS device. These files range between 1.5 GB and 2GB for iPhones and iPads, so be aware that it may take a bit of time to download it.
Once you have the file downloaded, plug your iOS device into your computer and open up iTunes. Go to your device’s summary page and hold down the Option/Alt key on your keyboard, or Shift if you’re on Windows. Keep holding down the key as you click on Restore in iTunes.
Next, browse to find the IPSW file that you downloaded and open it. iTunes will begin restoring your iPhone and will install iOS 8.1.3.
After the process is complete, your iOS device should now be running iOS 8.1.3. From there, you’ll want to restore your backup by going to the device summary page in iTunes and clicking on Restore Backup. Give it time to restore all of your apps and settings, and eventually you’ll be back to running iOS 8.1.3 just like you were before updating to iOS 8.2.
If You Want to Jailbreak
Unfortunately, iOS 8.2 nor iOS 8.1.3 are jailbreakable, and you can’t downgrade even further to iOS 8.1.2, which means you’re simply out of luck. However, if you’re still running iOS 8.1.2, you can easily jailbreak your device with TaiG’s latest jailbreak.
The TaiG jailbreak currently only works on Windows machines for the installation process and there’s no word on whether or not a Mac version will be on the way, but we wouldn’t be surprised to see it soon enough. Luckily, though, there’s another jailbreak tool that you can use to jailbreak your iPhone or iPad on Mac.
If you’re not running iOS 8.1.2, you’ll have to wait for an iOS 8.2 jailbreak, whichshouldn’t be too far off. The TaiG jailbreak team, which was responsible for the iOS 8.1 jailbreak, already has a jailbreak available for iOS 8.2 beta 1 and 2. However, there have been newer betas since then and Apple has closed access to the first and second betas for iOS 8.2, but the company hasn’t patched up those exploits, meaning that iOS 8.2 is still jailbreakable.
On the TaiG website, they have stated they’ve “already completed the untethered jailbreak support for iOS 8.2,” which could mean that the TaiG team already have newer exploits needed to crack iOS 8.2 if Apple patches up the current exploits that are being used. Of course, TaiG won’t disclose these exploits until iOS 8.2 officially releases and a jailbreak is complete.
This guide will show you how to install the iOS 8.3 update on the iPhone, iPad or iPod touch in about 25 minutes and help you with what you need to do before you tap Download and Install on the iOS 8.3 update.
The iOS 8.3 release delivers an incredible list of fixes that will solve many performance issues, odd behaviors and app crashes on the iPhone and iPad. In short, if you have problems with your iPhone on iOS 8, iOS 8.1 or iOS 8.2 this update promises to right those wrongs.
We’ll show you how to update to iOS 8.3 so that you don’t need to see that annoying red notification on Settings. This iOS 8.3 update guide will walk you through the upgrade on your iPhone or iPad, on iTunes and what to do if you are on the iOS 8.3 beta and want to upgrade to the final version.
Your guide on how to install iOS 8.3.
The iOS 8.3 update is a free update available to all devices running iOS 8. You don’t need as much free space as you did on earlier updates, but you will need to have some room available or to plug into a computer. You don’t need iOS 8.3 to use the Apple Watch, but if you skipped iOS 8.2 you will need to install this to prepare for the Apple Watch release later this month.
Users need at least 50% battery life (or to be charging) to install the update and you will need to download the nearly 300MB update on WiFi.
Here are the essential iOS 8.3 update installation tips and details.
iOS 8.3 Update Guide
Before you update to iOS 8.3 you should make sure that your iPhone is backed up to iCloud or to a local computer. There is always a small chance that something could go wrong, so it pays to back up your device. if you experience iOS 8.3 problems, you can also use this backup if you downgrade from iOS 8.3 to iOS 8.2.
We suggest installing iOS 8.3 from your home or your office. Even though there is little chance of something breaking, you should perform the update when you have time and where you have access to power, WiFi and a backup.
Advertisement
“How long will the iOS 8.3 update take?” is a common question already. depending on the download speed and your device this could take as little as 10 minutes or closer to 30 minutes. Make sure you have enough time.
How to Install iOS 8.3
When you are ready to install the iOS 8.3 update you just need 50% battery life and a WiFi connection. You don’t need a computer, but if you don’t have enough free storage space we can help you with that route.
Another question we’ve heard from beta testers is, “How to upgrade from the iOS 8.3 beta to the iOS 8.3 update?” The good news is Apple made this a simple process and you only need to follow the same directions as regular users, listed below.
Open the Settings app on the iPhone or iPad. If you cannot find this you can use Spotlight by pulling down from anywhere on the homescreen and typing, “Settings” into the box. Tap on General and then tap on Software Update.
Learn how to install iOS 8.3.
On this screen you can tap on Learn More to see all the iOS 8.3 fixes and update details or you can tap on Download and Install to start the upgrade. You will need to enter your passcode on this next screen before the upgrade starts.
Agree to the terms to install the iOS 8.3 update.
Now you will need to agree to the iOS 8.3 update terms and conditions twiceand the iOS 8.3 download will start. While the iOS 8.3 download completes you can use the iPhone or iPad. When complete, the iPhone will prompt to restart. You can choose to cancel if you aren’t ready to install the update, otherwise let the phone restart or tap Install.
If prompted enter your Apple ID password and choose to set up or skip Apple Pay.
When the iPhone restarts it will prompt you for your passcode. Enter your Apple ID password on the next screen and then verify the phone numbers for FaceTime and iMessage. You may also see a prompt to set up Apple Pay, whichyou can skip if you don’t want to use Apple Pay now.
After that screen the iPhone or iPad is ready to use and the iOS 8.3 update is complete.
How to Install iOS 8.3 from iTunes
if you don’t have enough room on your iPhone or iPad to install the iOS 8.3 download over the air, you can plug-in to a Mac or Windows with iTunes installed to perform the update.
When you connect the iPhone to a computer with iTunes open you may see a notification of the iOS 8.3 update or you might need to check manually. In iTunesclick on the device icon in the upper left area and then on Check for Update.
This is how to install the iOS 8.3 update form iTunes.
On the pop up, click Download and Update. You’ll see a list of what’s new in iOS 8.3. Click Next and then Click Agree. If prompted enter your passcode on your device. The software will download and install. When this is complete you will need to follow the prompts and enter your passcode, Apple ID password and may see a prompt to set up Apple Pay.
iOS 8.3 vs iOS 8.2: What’s New in iOS 8.3
New iPhone Emoji in iOS 8.3
iCloud Photo Library
Apple pulls the beta tag off iCloud Photo Library and with iOS 8.3 and the new OS X 10.10.3 update that adds Photos to Mac you can now keep all of your photos in iCloud and access them from any device including the edits you make.
Apple finally fixed the space bar on the iPhone so that you don't end up with periods instead of spaces when searching for thingds in Safari. The new space bar in iOS 8.3 is wider and the period is smaller so you will hit space when you need to and actually get the search results and search suggestions that you want.
This is a small fix, but it's one that we are happy to see, especially for those of us who use the iPhone 6 Plus where the problem wsa more noticeable.
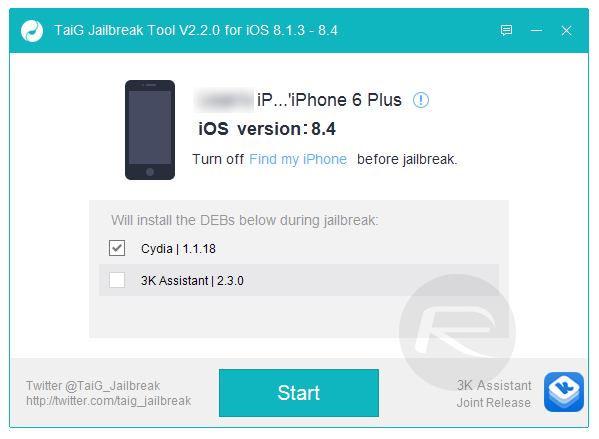
Update: iOS 8.4 has been released, and so is TaiG and PP jailbreak for iOS 8.4. iPhone 6, 6 Plus, 5s, 5c, 5, 4s, all iPads and iPod touches are supported. You can download the jailbreak tool of your choice from below and then follow our guides on how to jailbreak your device on iOS 8.4.
Here’s a brief timeline of the events leading up to the jailbreak.
The first beta of iOS 8.4 was released back in April. Later in same month, i0n1c was actually thefirst one to jailbreak iOS 8.4. He demonstrated his jailbreak, likely using different exploits than the ones used by TaiG, on an iPhone 6 running iOS 8.4 beta 1.
Apple announced at WWDC that Apple Music will be released as part of final version of iOS 8.4 on June 30th. And right on scheduled time, iOS 8.4 was released with support for Apple Music, Beats 1 and more.
Since TaiG released iOS 8.3 jailbreak only a week before iOS 8.4 went public, many in the jailbreak community feared that Apple may patch the jailbreak come the final release of iOS 8.4. But that didn’t happen as mere hours into release, iOS 8.4 got jailbroken.
It wasn’t all without drama though. PP jailbreak by 25PP was the first to release the jailbreak for iOS 8.4. TaiG accused them of stealing the code and releasing the jailbreak based on TaiG’s exploits.
An hour after PP jailbreak went public, TaiG dropped an updated version of its tool, v2.2.0, to jailbreak iOS 8.4.
In mid-July, PP jailbreak for Mac was released. This was the first iOS 8.4 jailbreak tool that worked with Mac OS X.
In early August, TaiG finally responded with its own Mac OS X version of the jailbreak tool.
Both PP and TaiG jailbreaks for iOS 8.4 supports all iOS devices, including, iPhone 6 Plus, iPhone 6, iPhone 5s, iPhone 5c, iPhone 5, iPhone 4s, iPad 4/3/2, iPad mini 3/2/1, iPad Air 2/1, iPod touch 5 and even the latest iPod touch 6.
Both TaiG and PP jailbreaks for iOS 8.4 are also backwards compatible for jailbreaking iOS 8.1.3, 8.2 and iOS 8.3.
Here’s our video tutorial of TaiG jailbreak for iOS 8.4 in action:
In mid-August, Apple released iOS 8.4.1 which patched jailbreak exploits used by TaiG in iOS 8.4 jailbreak.
This page will be continuously updated with all the latest on the jailbreak for iOS 8.4. For tutorials and download links, check out the updated links at the top of this post.
For details on iOS 8.3 jailbreak on how it came into existence, check out:
You can follow us on Twitter, add us to your circle on Google+ or like our Facebook page to keep yourself updated on all the latest from Microsoft, Google, Apple and the web.